
Back in the day, I attended a blogging conference and listened to a speaker tell me that basically, unless you’re taking photographs in RAW, your efforts are pointless.
Yeah, I know. ALL the eye rolls, right?
Photography can be a bit snooty, sometimes, and every blogging conference has its share of camera nerds who will tell you that if you spend less than a grand on your camera, you’d be better off whipping out a pencil and just sketching what you see. It’s easy to be hopelessly intimated by the whole business.
But… I switched to shooting in raw about a year ago, with a lot of help and support from a photographer friend, and I now advise all my blogging chums who want to take better photos to do the same. Because raw is the single best tool at your disposal if – like me – you have a habit of taking a really crap photo when you only have one chance to get a slightly decent photo.
First, a quick intro – what’s raw?
Basically, raw is the highest quality image your camera can shoot – if you’re using a DSLR or even a decent point and shoot like the Olympus PEN or Canon G7X, you have the option to shoot in raw. Lots of cameras will let you shoot in both JPEG and raw simultaneously so you get the best of both worlds.
While JPEG is a compressed and processed image file, raw is basically all the raw data your camera captured when you took a photo – not compressed, and not processed.
For this reason, raw files are bigger than JPEG files (about three times larger) and so you’re probably going to want to store your raw files on an external hard drive, or in the cloud, but definitely NOT on your computer. But these days, that’s really not a huge obstacle for most of us.
Because the raw file contains so much more information, you can DO a lot more with your images when you edit them. That means things like:
- Fix exposure without making your image grainy
- Adjust white balance (perfect for interior photos)
- Edit highlights of your image to recover ‘blown out’ things like bright sky or over-lit faces in a portrait
- Work with shadows to rescue under-exposed images
If you want to edit a photo shot in raw, then you’ll need some editing software. You can use the software that comes with your camera, but for my money, you’re better off using Lightroom or Photoshop – which you can buy as a package, on subscription for around £7 a month.
Lightroom, which is what I use, lets you make all the edits described above, and more. You can batch edit photos, and add watermarks to all your images in one fell swoop. You can sort and organise albums, add tags and keywords – it’s brilliant.
Once you’ve edited your images in Lightroom, you can easily export them as JPEG files to use online – and Lightroom will even apply sharpening to your files so they will look extra sharp and pretty on your blog. There are tools so you can add a watermark, copyright text in the meta tags, and location tags, if you choose.
But, but, but… there ARE a few potential downsides to shooting in raw, not just the storage issues.
First, because you’re used to seeing processed JPEG files from your camera, you might look at raw files to begin with and think, “They look a bit crap.” It’s true that raw files can sometimes look a bit flat, and that processing that’s done for you in JPEG? That’s now your job.
Second – a related point – you really can’t just connect your camera, download the images and post them. Shooting in raw does mean spending at least a bit of time working on images. But the batch editing tools and the ability to save your favourite adjustments as a custom setting mean you’ll get quicker over time.
But with a little bit of practice (and I promise you I am still a TOTAL beginner of this stuff) there’s no better way to rescue a photo that you didn’t quite capture the way you imagined. Rather than using raw because I’m a fancy photographer, then, I use raw because sometimes I go somewhere, completely FAIL to get the image I need, and there’s no opportunity to go back and re-do. That’s where raw really comes into its own.
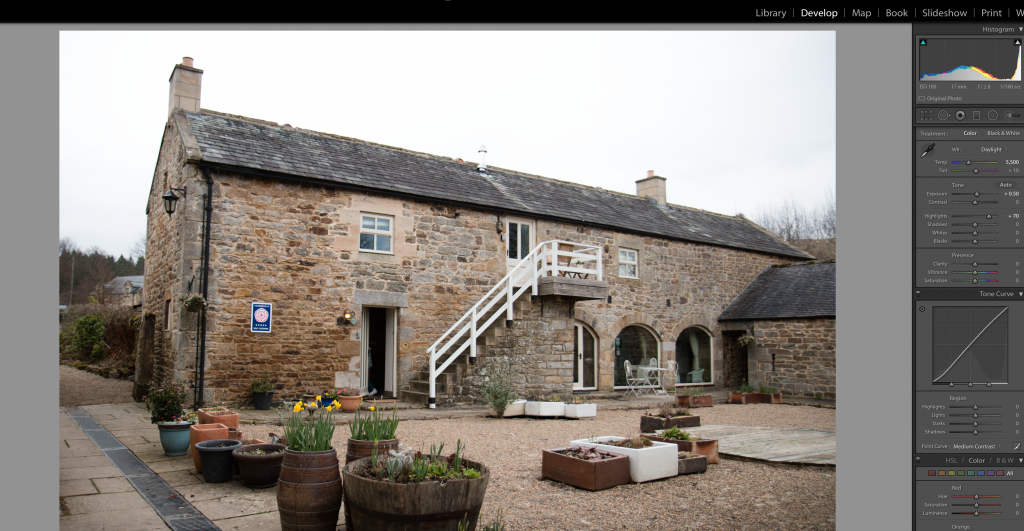
Take this weekend as an example – we reviewed a cottage in Northumberland. The weather was SHOCKING. That meant it was dark and gloomy indoors, the skies were washed out and grey, and getting decent photos was hard work. Looking at the images on my computer, I realise some of the crucial shots – of the cottage’s interior – were completely off. The white balance was wrong, the exposure was off, the colours washed out… and what can I do? I can’t take the photos again…
Having raw files gives you the opportunity to fix those mistakes – adjusting white balance to take account for cloud cover, or artificial light; boosting one colour in an image, knocking back highlights to recover some detail in a washed out background…
Here’s an example of what I mean:
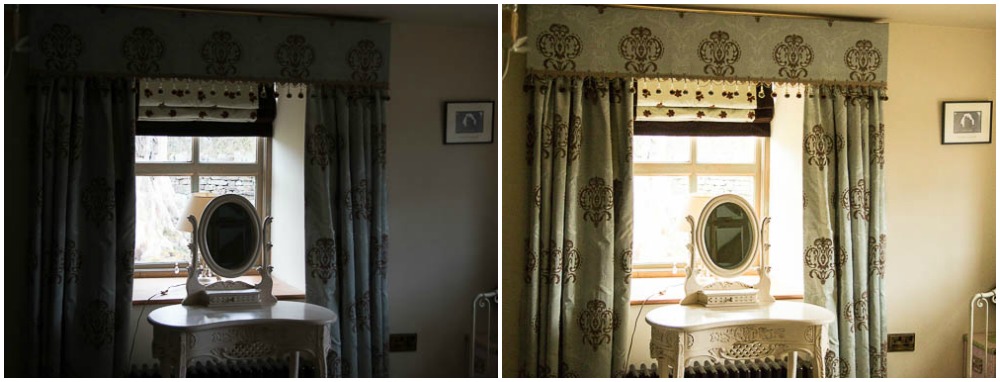
Here the camera adjusted for the light outside the window, meaning the pretty dressing table was thrown into complete darkness, and all the detail of the room was lost. Using raw meant I was able to fix the exposure and adjust the white balance to allow for the indoor daylight, meaning the image retains some warmth, and the colours of the decor are visible again. Is it perfect? Certainly not, but it’s a big improvement.
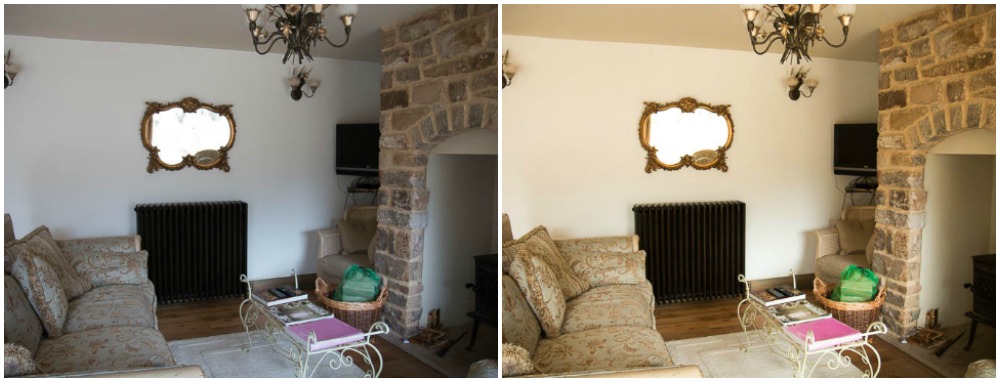
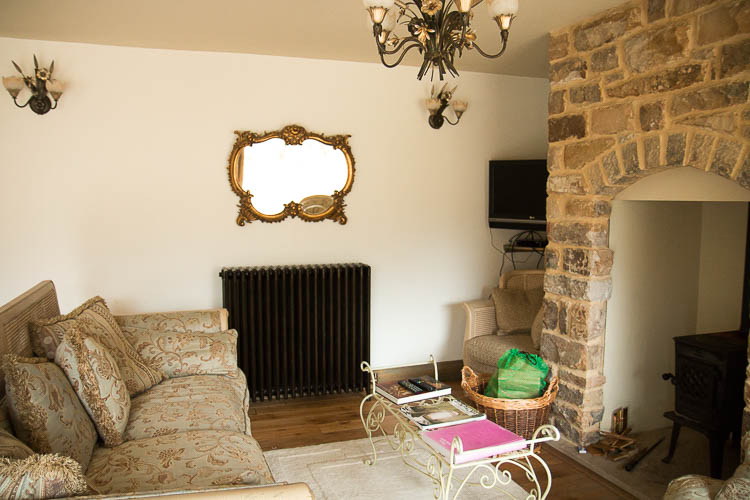
This shot was taken with my back to a huge window and the light has bleached a lot of colour from the image. You can’t see a lot of the details in the furniture or radiator. I used Lightroom to adjust the white balance to outdoor light, boosted the vibrancy and dropped some of the highlights to reveal the true colour of the fireplace and sofa. Again not perfect (the reflection in the mirror is still blown out) but it’s much more appealing and the photo is a far better representation of what I could actually see!
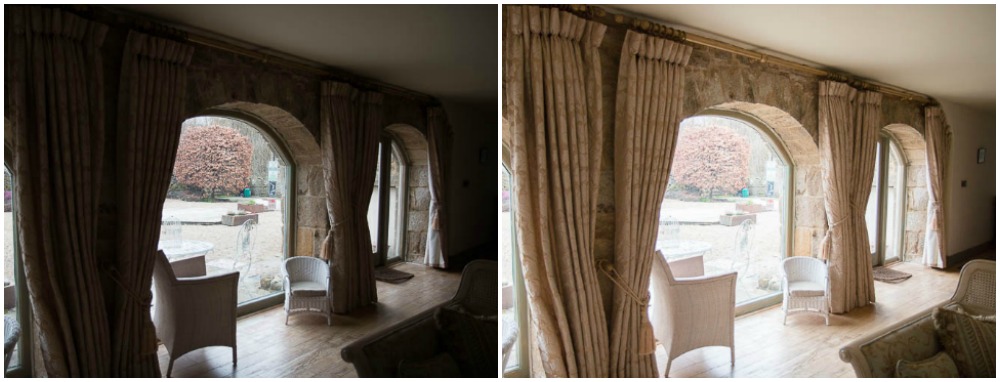
Another sterling “Sally takes a photo of a window” shot. I wanted to show how these big windows flood the cottage with light, but instead I made it look like we were sitting in the dark. Adjusting the white balance made a huge difference – I then reduced the highlights so the exterior wasn’t totally lost, and boosted the exposure slightly to allow the interior features to be seen more easily.
I hope you find this post useful and it encourages you to have a go at using raw, and editing your own wonky photos. Let me know if you do!
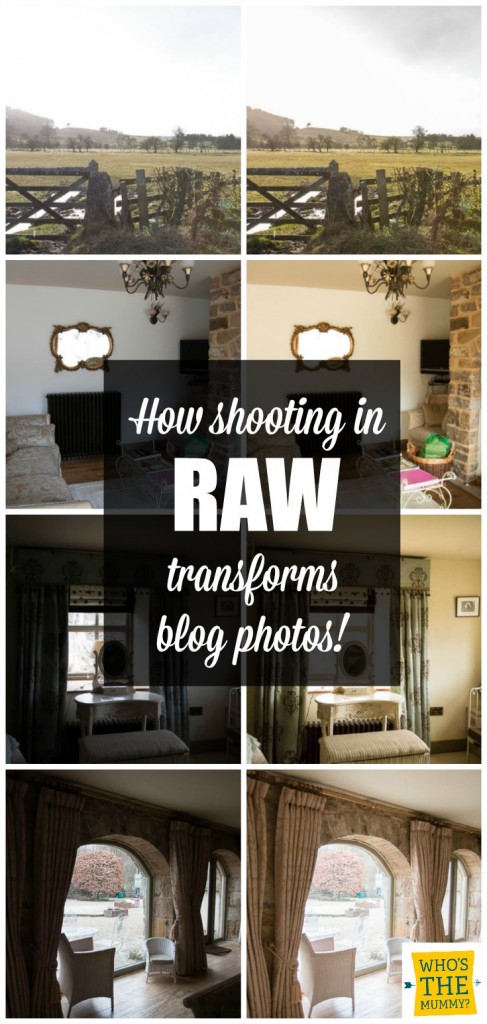
Pin it for Later!


I don’t agree with the speaker that it is pointless if you don’t use RAW, but it is one of the useful features on a big fancy camera. When I was still actively blogging and using a DSLR, I would take my photos in RAW. I have recently found a phone app that allows me to shoot RAW on my Samsung S6, but processing images is a bit more tricky. I used it for 18months ish, and have recommended it to a friend who has a keen interest in photography although he is yet to try it.
Yes, I like that raw is now available on lower end cameras too.
I found this post REALLY useful and will definitely be having a go at shooting some images in RAW to see what’s possible.
Thanks for sharing.
Thanks Missy!
It’s funny because I used to shoot all my photos in RAW and then I totally got out of the habit. I need to start doing it again as it’s always worth having the best photographs possible.
#MMWBH
Yes, definitely!
Pinned! I’m so unbelievably sick of my crap photography, but I can’t currently afford lights, screens, or indeed a photography course! I’ve got Photoshop and Affinity so will give raw a try, thanks Sally!
Have a go – there’s no harm in giving it a try!
Great tips here, we tend to shoot RAW with the Canon and I like the immediacy of my phone pictures although using those less and less even on my social media platforms.
Thanks Vicki – if my photos look a tenth as good as yours, I’d be happy!
First let me say that I agree with almost everything Sally says in this post.
I just don’t think that RAW is the end all and be all. I’m a big believer that you should use what you have- camera phone, point & shoot, dslr… if your ‘camera’ doesn’t shoot raw that doesn’t mean all your photos will be shit. It’s a balance between light and dark and capturing that image. It’s the photographer and not the kit.
Please please don’t think that you have to spend lots of money on an expensive camera, software, lights and gear.
Yes RAW does give you the flexibility as it’s like having a digital ‘negative’ where as a JPEG the image has been compressed so you lose some of the fine detail. For blogging JPEG is totally acceptable. It’s very difficult even when shooting in RAW to save a crap photograph. You’re better trying to get the best shot straight out of the camera. The RAW image size is so big that it bogs down most computers not to mention fills up your SD cards- fast! Take time with your photograph, seeing what’s in the background, make sure what you want to be in focus is in focus. Get the best image you can from the start and odds are you’ll have a nice photograph.
Anyway all that to say- don’t get bogged down with the technical side of things- get out there and photograph the world. The wonderful thing about digital photography is that it doesn’t cost you a bean if you take 100 photographs to get that one you consider to be perfect. Practice the craft of photography and the amazing photographs will follow.
*grabs soapbox & runs away*
I kinda sorta agree. But… a raw file is 3 times the size of the equivalent JPEG. While that might have seemed unwieldy 10 years ago when storage and processing were both expensive and hard to come by on consumer machines, I don’t believe those are really significant issues these days unless you’re processing on a tablet or phone with limited resource.
Yes, for storage, it’s probably better that you move your photo archive off your laptop, but then I’d say the same for someone shooting in JPEG. I certainly didn’t notice any difference in performance when I moved from JPEG to raw, and I’m not using especially high-end machines.
Brilliant post, Sally! I also made the jump about a year ago and O haven’t looked back, although I only use Photoshop and can’t batch process. To make my life easier, I take photos both in RAW and JPEG, so if I want to send the photos to friends, I can still do it in a couple of minutes.
I totally agree with you, with blog photos its all about the editing and raw is so much better for this.
I love shooting in RAW but in truth, it’s not something I do as often as I should! Thanks so much for linking up to the #MadMidWeek Linky! x
It’s the usual trade off between time and effort though – if you have no time and no fancy camera then you can achieve a lot of this with various editing apps and at least you have something to show but yes, in an ideal world we’d have the camera, the time to edit and the time to learn a new skill
I always look to try and take any video/photographs in the highest quality available, so that in 10 years time when the RAW photographs taken today are considered to be the equivalent of ‘photographic slides’ they are easier to ‘enhance’ compared to those from a smartphone. #BeInspired
I think that’s a really good point – future-proofing photos is a good idea!